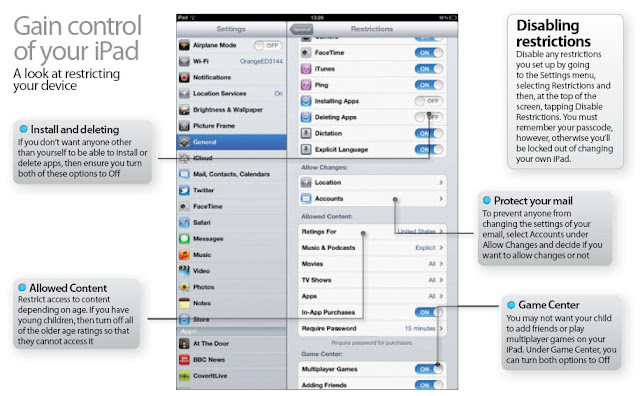
Thankfully, every iPad has a built-in set of Parental Controls. There are four sections within the Restrictions menu in Settings>General. The first is Allow which lets you decide if a child has permission to use apps such as Safari, YouTube or iTunes. Turning these apps off will not only passcode protect them but their icons will also disappear from the home screen. You can also give permission to install or delete apps here. What’s more, if you disable Safari or YouTube, then clicking on links won’t work either.
As well as Allow, there is Allow Changes, which can stop people altering anything under the Mail, Contents and Calendar settings and Allowed Content which can restrict access to music and movies. Finally, you can control Game Center access.
Add Parental Controls to your iPad
If you are wary of allowing your children or other people use of your iPad, then you can ensure that various apps and services are locked down
App used: Settings
Difficulty: Easy
Time needed: 5 minutes
Lock down your iPad
1: Access Settings
Tap on the Settings icon on the home screen, then go to General. We want to restrict access to our iPad so tap on the Restrictions option.
2: Enable Restrictions
At the top of this page is an Enable Restrictions option. Beneath this is a greyed-out list of items. Tap Enable Restrictions.
3: Set passcode
To have access to the restrictions, you need a passcode. This will also mean that, when in your hands, you can lift the restrictions at any time.
4: Allow or disallow
Now you can start to set your restrictions. For example, to stop someone browsing Safari on your iPad, slide On to Off.
5: Allowing content
Tapping Ratings For will let you work with age ratings for your country. This will let you, for example, only allow child-friendly films.
6: Location aware
The Location option lets you decide which apps can have access to your iPad’s location services. Again, simply choose On or Off.
 From : iPad Tips, Tricks, Apps & Hacks Volume 4 - Imagine Publishing Ltd
 TFHSAR4DC69E

