 What use would an iPad be if you couldn’t stay in touch with your friends online? You can access an existing e-mail account using the handy Mail app supplied with your iPad, or you can sign into your e-mail account using the Safari browser. Using Mail involves adding one or more existing e-mail
accounts using iPad Settings. Then you can use Mail to write, format, retrieve, and forward messages from any e-mail accounts you added to iPad.
Mail offers the capability to mark the messages you’ve read, delete messages, and organize your messages in folders, as well as use a handy Search feature. New with iOS 6 comes the ability to create a VIP list so that you are notified when that special person sends you an e-mail. In this chapter, you find out about Mail and its various features.
 Adding an Account
To use the Mail app to access e-mail on iPad, you first have to make settings for an existing e-mail account on your iPad. You can add one or more e-mail accounts using iPad Settings, including any e-mail account that you’ve associated with an iCloud account. If you set up multiple accounts, you can then switch between accounts by tapping an account name in the upper-left corner of the displayed inbox, and then tapping Accounts and choosing which account to display. Or you can use the consolidated inbox and check your mail from all active accounts on one page.
If you have an iCloud, Gmail, Yahoo!, Windows Live Hotmail, or AOL account, iPad pretty much automates the setup. Here are the steps to get you going with any of these e-mail providers:
1. Tap the Settings icon on the Home screen.
2. In the Settings pane, tap Mail, Contacts, Calendars. The settings shown in Figure 7-1 appear.
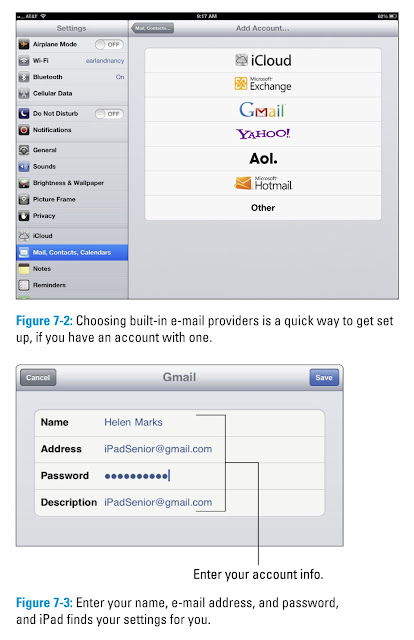
3. Tap Add Account. The options shown in Figure 7-2 appear.
4. Tap iCloud, Gmail, Yahoo!, AOL, or Windows Live Hotmail and then enter your account information in the form that appears (see Figure 7-3).
5. After iPad takes a moment to verify your account information, tap any On/Off button to have Mail, Contacts, Calendars, or Reminders from that account synced with iPad.
6. When you’re done, tap Save. The account is saved, and you can now open it using Mail.
taken from :
iPad® All-in-One For Dummies®, 5th Edition
by Nancy Muir